
To record a Zoom meeting, click “Record” in the meeting toolbar, then choose “Record on this Computer” (saves locally, available on Zoom’s free plan) or “Record to the Cloud” (saves to Zoom’s servers, requires a paid plan). By default, only the meeting host can start a recording — a participant needs the host to explicitly grant recording permission first. A visible on-screen notice appears for all participants once recording begins; there’s no way to record without it showing.
The Step After Recording That Nobody Warns You About
Every guide to recording a Zoom meeting walks through how to start one, and stops there as if clicking “Stop Recording” at the end of the call is the last thing that matters. For a local recording specifically, it isn’t. Zoom captures the meeting as raw audio and video files first, then converts them into a normal, playable .mp4 once the meeting ends, and that conversion step is exactly where things quietly go wrong.
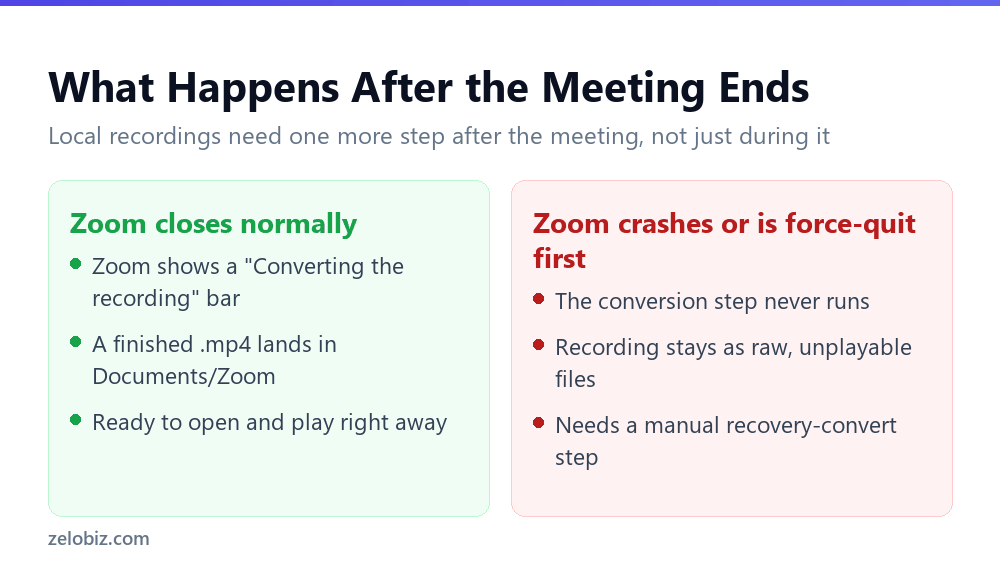
To recover it, open Zoom, click your profile picture, then Settings, then the Recording tab, and look for Convert or a similar recovery option depending on your Zoom version. Point it at the folder containing the interrupted recording, usually inside Documents > Zoom, named after the meeting date and time. Running the conversion again from there produces the finished .mp4 the same way the automatic process would have.
⚠️ Watch out: Don’t delete the meeting’s recording folder just because it doesn’t contain a playable video yet. The unconverted files inside, often with names like double_click_to_convert or similar, are the actual recording. Deleting them because “the recording didn’t work” is the one mistake that turns a recoverable situation into an unrecoverable one.
It’s worth checking the recording location setting once, before it matters, rather than during a recovery attempt under time pressure. In Zoom’s Settings under the Recording tab, the “Store my recording at” field shows exactly where local files are being saved on that specific computer, and it can be changed to somewhere easier to find, like a dedicated folder on the desktop, instead of leaving it buried inside Documents.
Local vs. cloud recording

Local recording — saves the recording directly to your own computer once the meeting ends, and is available on Zoom’s free plan without needing any paid subscription.
Cloud recording — saves the recording to Zoom’s own servers instead, generating a shareable link that others can access without needing the file sent to them directly; this option requires a paid Zoom plan and isn’t available on the free tier.
Only the host can record by default — a regular meeting participant doesn’t see a “Record” option at all unless the host has specifically granted them recording permission, either for that one meeting or as an ongoing account setting.
Recording notifies all participants — a clearly visible on-screen notice appears for everyone in the meeting the moment recording starts; there’s no way to record a Zoom meeting invisibly or without this notification appearing.
Check local recording laws — some jurisdictions legally require obtaining consent before recording a call or meeting; worth being aware of the specific requirements that apply to your location and the participants involved.
Only the meeting host can start a recording by default — if the “Record” option is missing entirely for a participant, that’s almost always the reason, rather than anything actually broken.
Recording a meeting

Click “Record” in the meeting toolbar, located at the bottom of the Zoom meeting window.
Choose “Record on this Computer” or “Record to the Cloud” — local recording saves to your own device; cloud recording requires a paid plan and saves to Zoom’s servers instead.
Recording begins, and a visible notice appears for all participants confirming the meeting is being recorded.
Click “Stop Recording” when finished, or the recording automatically stops when the meeting ends — the file then processes and saves automatically, with local recordings typically appearing in a dedicated Zoom folder on your computer once processing completes.
Granting recording permission to a participant
As the host, allowing a specific participant to record requires going to the Participants panel during the meeting, hovering over that participant’s name, clicking “More,” and selecting “Allow Record.” This grants recording permission just for that meeting; it doesn’t apply automatically to any future meetings unless separately granted again.
Finding a recording after the meeting
Local recordings need processing time after the meeting ends before the file becomes available — Zoom shows a progress indicator during this step, and the finished file typically lands in a Zoom-specific folder within your computer’s Documents folder by default, unless a different save location was configured.
That processing step scales with the meeting itself. A 15-minute call converts in well under a minute on most computers, while a two-hour webinar with several participants’ video feeds can take a comparable length of time to process, especially on an older laptop. Closing the laptop lid or letting it go to sleep partway through that window is the single most common way the interruption described above actually happens, since it feels like the meeting is already finished and safe to walk away from.
For anything long enough to worry about, plugging into power and adjusting the sleep settings for that session removes most of the risk outright. On Windows, Settings, System, Power, and setting “Screen and sleep” to Never for the duration of an important recorded call is a five-second change that costs nothing and prevents the exact interruption that leads to a stuck conversion. Reverting it afterward is optional, since it only affects convenience, not safety, but it’s an easy habit to build for anyone who records regularly.
Cloud recordings appear in the Zoom web portal under “Recordings,” typically within a few minutes to a couple of hours after the meeting ends depending on length, and can be shared via a generated link directly from there.
A worked example: recording a client meeting for someone who couldn’t attend
Say a team is meeting with a client, and a key colleague who needed to be part of the discussion couldn’t make the scheduled time — the host decides to record the meeting specifically so that colleague can catch up afterward.
Before starting, the host mentions to the client at the very top of the call that the meeting will be recorded for a colleague who couldn’t attend, and confirms that’s acceptable — both a courteous practice and, in some jurisdictions, a genuine legal requirement depending on where the participants are located. Once confirmed, they click “Record” and choose “Record on this Computer” for local recording, since a paid cloud plan wasn’t specifically needed for a single internal follow-up.
During the meeting, they also make sure to click “Share Screen” as usual for any slides or documents being discussed, since the recording only captures whatever’s currently visible on screen — if the recording layout setting isn’t configured to include shared content, an important part of the discussion could end up missing from the final file even though the audio conversation was captured correctly.
After the meeting ends, they wait for local processing to complete (a notification appears once it’s ready), then rename the file with a clear, dated name before sending it directly to the colleague who missed the call, rather than leaving it with Zoom’s default auto-generated filename, which would be far less useful for anyone searching through a folder of many past recordings later.
Recording etiquette and consent
Beyond the legal consent requirements that vary by location, there’s a practical courtesy worth following regardless of what’s strictly required: mentioning at the start of a meeting that it’s being recorded, and briefly noting why, tends to keep participants more comfortable and engaged than simply relying on Zoom’s visible on-screen notice alone. This matters especially for meetings involving people outside your own organization, where the expectation of being recorded is less automatically assumed than it might be in an internal team meeting.
For recurring meetings that are always recorded as a matter of course (many training sessions or all-hands meetings, for instance), stating that expectation once clearly in the calendar invite or meeting description avoids needing to re-explain it verbally at the start of every single occurrence.
Beyond consent, it’s also worth thinking about where a recording is stored and who can access it afterward, particularly for anything involving sensitive client or personal information — a recording saved locally on a personal laptop with no further access controls is a different privacy situation than one saved to a properly managed cloud storage location with appropriate permissions set. Deleting recordings that are no longer genuinely needed, rather than letting them accumulate indefinitely, is a simple habit worth building for the same reason, and reviewing that accumulated list periodically rather than only when storage space runs low keeps the habit genuinely sustainable.
For organizations with a formal retention policy covering recorded meetings, checking what that policy actually requires — how long recordings must be kept, and where they’re required to live — before choosing local versus cloud recording avoids having to redo the choice after the fact once someone in compliance or IT flags it. This is worth confirming with IT directly rather than guessing, especially at a larger organization with formal data-handling requirements already firmly in place ahead of time.
Recording not working right?

“Record” option missing entirely — the host hasn’t enabled recording permission for you specifically; ask them to grant it through the Participants panel.
Cloud recording option grayed out — requires a paid Zoom plan; it’s simply not available on the free tier regardless of settings.
Can’t find the recording after the meeting — local recordings need processing time after the call ends before the file becomes available; check again after a few minutes rather than assuming it failed.
Recording doesn’t include the shared screen — check the recording layout setting (in Zoom’s settings, under Recording) before starting, since some layout configurations can exclude shared content depending on how they’re set.
Need to record without the visible notice — not possible; every Zoom recording, local or cloud, always notifies all participants when it’s active, with no setting to disable this.
- ✓Confirm you actually have recording permission if ‘Record’ seems to be missing
- ✓Choose local recording if a paid plan for cloud recording isn’t available
- ✓Wait for local recordings to finish processing before assuming something failed
- ✓Check local laws about consent before recording a call, if relevant
- ✓Grant recording permission through the Participants panel if a participant needs it
- ✕Assuming a missing ‘Record’ button means something is broken rather than restricted
- ✕Expecting cloud recording to work on a free-tier Zoom account
- ✕Assuming a local recording failed just because it isn’t immediately available
- ✕Recording a call without being aware of applicable consent requirements
- ✕Expecting recording permission granted once to automatically carry over to future meetings
Worked example: recovering a recording after a laptop lost power mid-conversion
A host records a two-hour client meeting locally on a laptop. Right after clicking “End Meeting,” the laptop’s battery dies before Zoom finishes converting the recording. Plugging it back in, Zoom opens normally, but there’s no finished video file anywhere in the meeting’s folder.
The recovery conversion takes roughly as long as the original meeting did, since it’s processing the same two hours of audio and video from scratch, just on this second manual attempt instead of running automatically in the background the way it would have the first time. A progress bar shows the same way it would have right after the meeting, and the finished file lands in the same folder once it completes.
If the recovery option in Settings doesn’t find anything worth converting, it usually means Zoom is currently pointed at the wrong folder location rather than the recording actually being gone for good. Zoom’s default local recording location can be changed in Settings at any point, including mid-project, so it’s worth double-checking that setting against wherever the specific meeting’s files actually landed before concluding the recording is unrecoverable.
This is also a good argument for cloud recording on any meeting that truly can’t be re-run, client calls, interviews, anything one-shot, since a cloud recording finishes processing on Zoom’s servers rather than depending on the local computer staying powered on and the app staying open until conversion completes.
Frequently asked questions
My Zoom recording didn’t convert after the meeting. Is it lost?
Probably not. Check the meeting’s folder in Documents/Zoom for raw, unconverted files, then use Settings, Recording, and the convert or recovery option in Zoom to re-run the conversion manually. The recording usually survives even when the automatic conversion doesn’t complete.
How do I record a Zoom meeting?
Click ‘Record’ in the meeting toolbar, choose local or cloud recording, and click ‘Stop Recording’ when finished.
Why don’t I see a ‘Record’ option in my Zoom meeting?
By default, only the host can record. A participant needs the host to explicitly grant recording permission through the Participants panel.
What’s the difference between local and cloud recording?
Local recording saves to your own computer and is available on the free plan. Cloud recording saves to Zoom’s servers and requires a paid plan.
Do participants know when a Zoom meeting is being recorded?
Yes, always. A visible on-screen notice appears for everyone the moment recording starts, with no way to disable it.
Where do I find my Zoom recording after the meeting?
Local recordings appear in a Zoom folder in your Documents after processing. Cloud recordings appear in the Zoom web portal under ‘Recordings.’
How do I let a participant record a Zoom meeting?
As host, open the Participants panel, hover over their name, click ‘More,’ and select ‘Allow Record.’
- →Share your screen during the recorded meeting: how to share screen on Zoom
- →Look camera-ready for the recording: how to blur background on Zoom
- →Build slides to present and record: how to make a PowerPoint presentation
- →Convert the finished slides to PDF for sharing: how to convert PowerPoint to PDF