
The fastest way to screenshot on Windows: press Windows + Shift + S to select and copy any part of the screen, or Windows + PrtScn to save the whole screen straight to a PNG file in Pictures › Screenshots. The difference matters: Windows+Shift+S copies to your clipboard and creates no file until you click the notification and save it. Pressing PrtScn on its own also only copies — which is why it looks like nothing happened.
The reason Print Screen seems broken
Most people learn one screenshot method: press the Print Screen key. Then they go looking for the file, find nothing, and conclude the key is broken or the laptop is faulty.
The key worked. Windows copied the image to your clipboard — the same invisible holding area that Ctrl+C uses. There’s no file because you never asked for one. Open Paint, or Word, or the message box you’re typing in, press Ctrl+V, and the screenshot appears.
Print Screen doesn’t save a screenshot. It copies one. Almost every ‘my screenshots aren’t working’ problem is that one sentence.
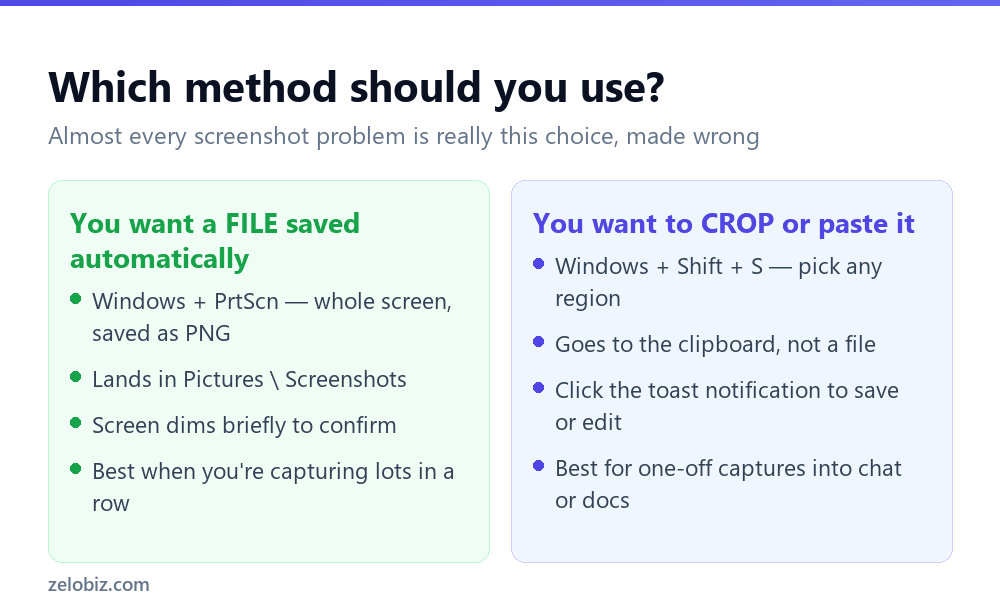
Once that clicks, the six methods below stop looking like six random shortcuts and start looking like what they are: two groups. Some copy to the clipboard, some write a file to disk. Pick based on what you’re about to do with the image.
The six built-in methods
There’s no seventh secret method, and you don’t need third-party software for ordinary work. The paid screenshot tools earn their money on scrolling capture and team libraries, not on anything in this table.
Windows + Shift + S, properly
This is the one to build muscle memory for. It handles regions, whole windows and full screen, it works the same on Windows 10 and 11, and it puts an editor one click away.
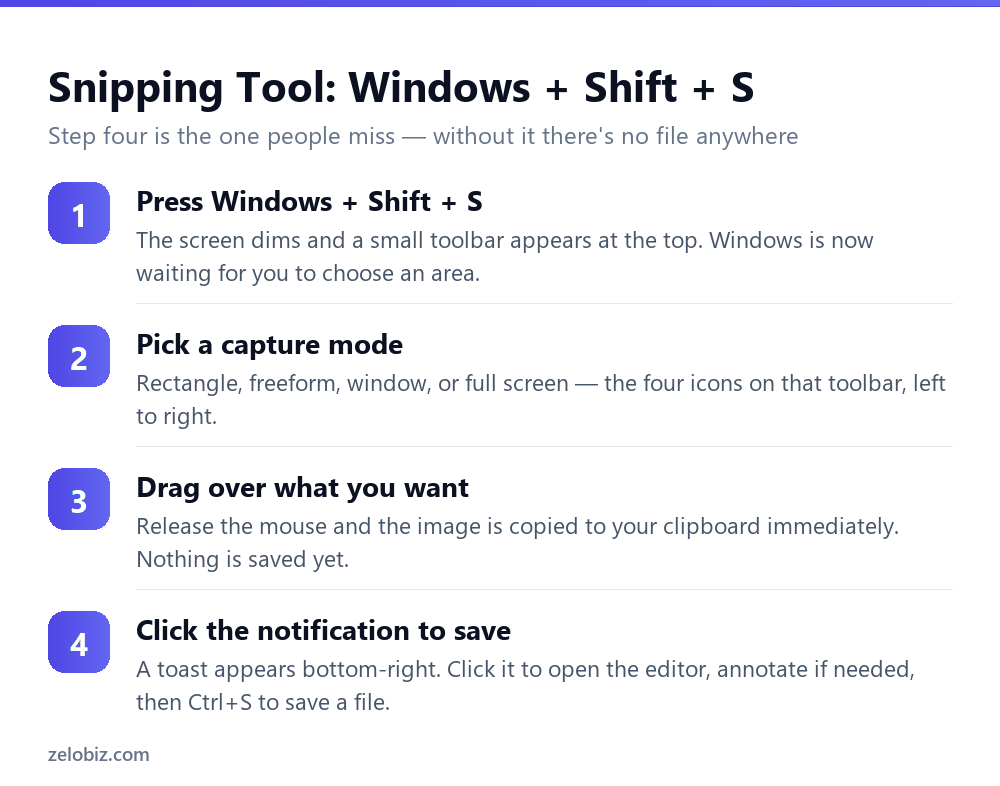
The four icons on that dim toolbar, left to right: rectangular (drag a box), freeform (draw any shape), window (hover and click a single window), and full screen. Window mode is underused and excellent — it captures a dialog box perfectly, with its shadow, and no fiddly dragging.
⚠️ Watch out: If the toast notification disappears before you click it, the image is still on your clipboard. Paste it somewhere. You can also reopen recent captures from the Snipping Tool app’s history.
Where Windows actually puts your screenshots
Three different destinations depending on the method, which is the second-biggest source of confusion after the clipboard thing.
To change where Windows+PrtScn saves: open File Explorer, right-click the Screenshots folder, choose Properties, then the Location tab, and move it. Windows follows the folder rather than the path, so the shortcut keeps working afterwards.
💡 Pro tip: If your Screenshots folder is syncing to OneDrive and filling your quota, this is the fix — move the folder somewhere outside the OneDrive tree rather than turning the shortcut off.
When Print Screen genuinely doesn’t work
Having ruled out the clipboard explanation, there are a handful of real causes, and one of them catches almost everybody on a laptop.

The laptop Fn key
Compact keyboards double up their function row. Print Screen often shares a key with something else and only fires when you hold Fn at the same time. Look for the label printed in a different colour — if PrtScn is blue or grey while the main label is white, it needs Fn.
The Snipping Tool hijack
Windows 11 has a setting that reassigns the Print Screen key to open the Snipping Tool instead of copying the screen. It’s genuinely useful, but if you didn’t know it was on, the behaviour looks broken. Find it under Settings › Accessibility › Keyboard, then ‘Use the Print screen key to open Snipping Tool’.
OneDrive is intercepting it
OneDrive can offer to save every screenshot automatically, and once enabled it quietly takes over. Your captures aren’t lost — they’re in OneDrive’s Pictures › Screenshots folder in the cloud. Toggle it in OneDrive › Settings › Backup.
Capturing a menu that closes when you click
Right-click menus, dropdowns and tooltips vanish the moment you press a shortcut or move the mouse. This is the single most annoying screenshot problem in Windows, and it has a proper solution rather than a workaround.
For a tooltip that only appears on hover, the delay timer is the only reliable way to get it. Ten seconds feels long until you’ve fumbled a three-second attempt twice.
Multiple monitors, and the whole-screen problem
With two or three displays, PrtScn and Windows + PrtScn capture all of them stitched into one very wide image. That’s rarely what you want, and it’s why people end up cropping every screenshot.
Use Alt + PrtScn to grab just the window you’re working in, or Windows + Shift + S in window mode to click the one you want. Both ignore the other monitors entirely. If you regularly need one full display, drag a rectangle with Windows+Shift+S — it snaps roughly to screen edges and is quicker than cropping afterwards.
What Windows still can’t do
Two honest gaps, so you don’t waste time hunting for settings that don’t exist.
Scrolling screenshots. Windows has no built-in way to capture a long web page or document beyond the visible screen. Browsers can do it themselves — in Chrome or Edge, press F12, then Ctrl+Shift+P, type ‘screenshot’ and choose ‘Capture full size screenshot’. For applications other than a browser you need a third-party tool; this is the one genuine reason to install one.
The mouse cursor. None of the standard methods include the pointer. If you’re writing instructions and need the cursor visible, use the Game Bar or a recording, or add an arrow yourself in the Snipping Tool editor.
Editing and annotating without extra software
The Snipping Tool editor covers more than people expect. Crop, a pen with adjustable colour and thickness, a highlighter, a text box, shapes, and a genuinely good redaction tool for blurring sensitive information before you share.
That last one matters more than it sounds. Screenshots leak things — email addresses in a sidebar, an account balance, a customer name in a browser tab. Blur before you send, not after someone points it out.
- ✓Learn Windows + Shift + S first — it covers most situations
- ✓Use Alt + PrtScn for a single window on a multi-monitor setup
- ✓Use the delay timer for menus and tooltips
- ✓Blur sensitive details before sharing
- ✓Move the Screenshots folder if OneDrive sync is a problem
- ✕Assuming PrtScn is broken because no file appeared
- ✕Cropping every multi-monitor screenshot by hand
- ✕Installing a screenshot app before trying the built-in tools
- ✕Sharing a full-screen capture with your tabs and taskbar visible
- ✕Hunting for a scrolling-capture setting — there isn’t one
Frequently asked questions
Where do screenshots go on Windows?
Windows + PrtScn saves to Pictures then Screenshots. The Game Bar saves to Videos then Captures. PrtScn and Alt + PrtScn save nothing at all — they copy to the clipboard, so you need to paste them somewhere.
How do I screenshot just one window?
Alt + PrtScn copies only the active window. Or press Windows + Shift + S and choose window mode, the third icon, then click the window you want.
Why is my Print Screen key not working?
On laptops it usually needs Fn + PrtScn. Otherwise check Settings, Accessibility, Keyboard for the setting that reassigns Print Screen to the Snipping Tool. In most cases the key worked and the image is on your clipboard — try pasting into Paint.
How do I take a screenshot without the Print Screen key?
Windows + Shift + S needs no Print Screen key at all. You can also open the Snipping Tool from the Start menu, or use Windows + G for the Game Bar’s capture button.
Can I take a scrolling screenshot on Windows?
Not with built-in tools. For web pages, open developer tools with F12, press Ctrl+Shift+P, type screenshot and choose capture full size screenshot. For other apps you need third-party software.
How do I screenshot on Windows 10 versus Windows 11?
Every shortcut here works identically on both. The only real difference is that Windows 11’s Snipping Tool replaced the older Snip & Sketch and added screen recording.
- →Free up space taken by all those captures — how to free up disk space on Windows
- →Speed things up generally with how to clear cache on Windows
- →Working with two apps side by side: how to split screen on Windows
- →On a Mac instead? How to screenshot on Mac