

Here’s the part most lock-cells tutorials bury near the bottom: checking the “Locked” box does nothing by itself. The cell stays fully editable.
Locking only takes effect once you protect the sheet. Skip that second step, and nothing changed at all, no matter how carefully you selected and locked the right cells.
Short answer: To lock cells in Excel, select them, open Format Cells from the Home tab’s Alignment group, check Locked on the Protection tab, then go to the Review tab and choose Protect Sheet. That last step is what actually matters. Cells are locked by default before you do anything, but locking has zero effect until the sheet or workbook is protected. A password isn’t required to protect a sheet, though without one, anyone can remove protection through the same menu. Verified directly against Microsoft’s own support documentation on 4 September 2026.
The Four Steps
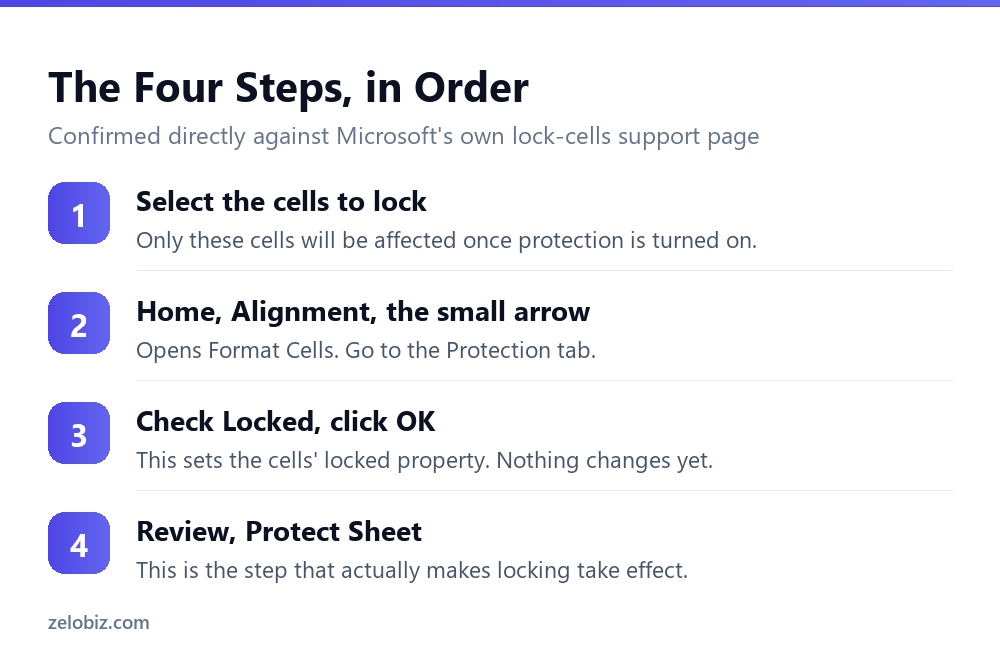
Steps 1 through 3 set a property on the cells. They don’t enforce anything on their own. Step 4 is the one that turns that property into an actual restriction.
Why Locking Alone Doesn’t Work
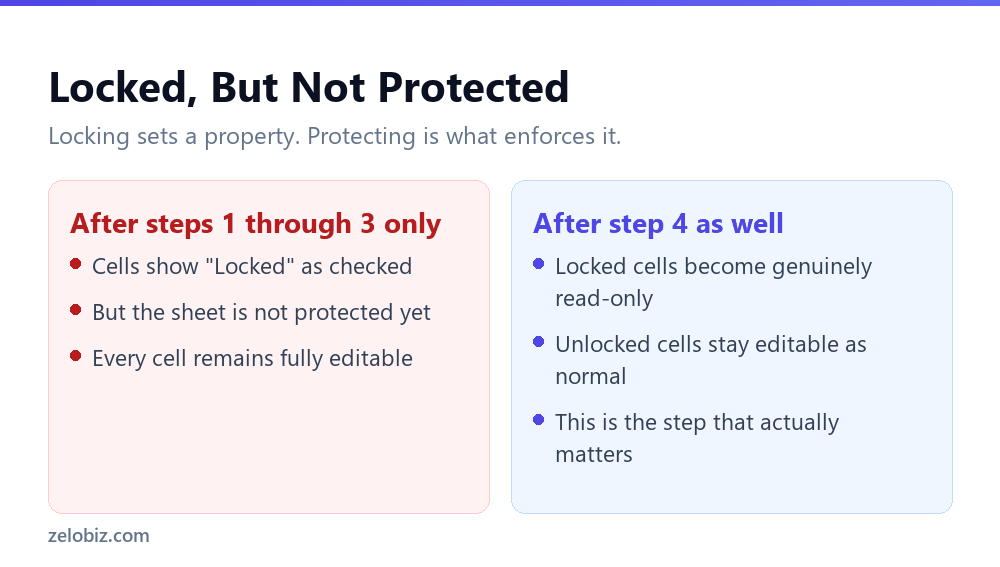
So why does this trip so many people up? Because the Locked checkbox looks like the whole solution. It’s the step with a dedicated dialog box, a clear checkbox, an obvious “this is what I came here to do” feeling.
But Excel treats every cell as locked by default, even before you touch anything. That default only becomes meaningful once protection is switched on. Until then, a locked cell and an unlocked one behave identically: both fully editable.
⚠️ Watch out: If you’ve locked cells before and the sheet still let you edit everything, this is almost certainly why. Check the Review tab, not the Format Cells dialog, to confirm protection is actually active.
What a Password Actually Does
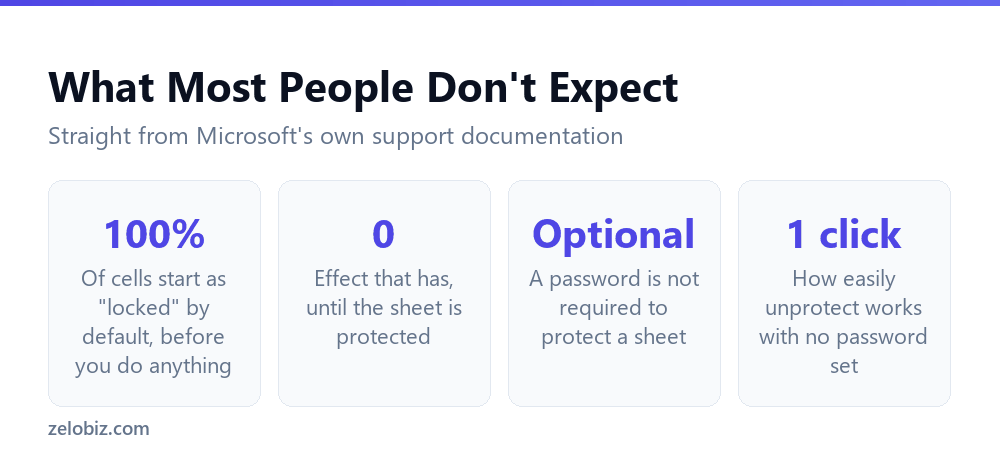
Protect Sheet offers an optional password field. It’s actually optional, not just labeled that way. You can protect a sheet with no password at all.
Without one, the protection still works day to day. Locked cells stay locked. But anyone can remove that protection entirely, since unprotecting a sheet with no password takes a single click on Unprotect Sheet, no prompt required.
So a password doesn’t make locked cells more locked while protection is active. It controls something different: who’s allowed to turn protection off in the first place.
💡 Pro tip: Skip the password for a sheet where protection exists mainly to prevent accidental edits by the same person using it. Add one when the goal is stopping a specific other person from removing protection on purpose.
Unlocking Specific Cells Before You Protect
Protecting a sheet locks every cell by default, since every cell already carries that property. For a form or template where some cells need to stay editable, that’s the wrong outcome.
The fix happens before protecting, not after. Select the cells that should remain editable, open Format Cells, go to Protection, and uncheck Locked for just those cells. Everything else keeps its default locked property.
Then protect the sheet as usual. The unchecked cells stay editable. Everything else becomes read-only. This order matters: unlock the exceptions first, protect second.
📊 Note: It’s a best practice to unlock any cells you want editable before protecting, though Microsoft’s own documentation confirms you can also unlock them after protection is already applied, by removing and reapplying protection.
Protecting a Sheet vs. Protecting a Workbook
Protect Sheet and Protect Workbook do different jobs, and mixing them up causes confusion. Protect Sheet controls whether cells on that specific sheet can be edited, based on their Locked property.
Protect Workbook controls the workbook’s structure instead: whether sheets can be added, deleted, renamed, or reordered. It has nothing to do with individual cell editing.
So locking cells specifically requires Protect Sheet, not Protect Workbook. Turning on workbook protection alone leaves every cell exactly as editable as before.
A Worked Example: Building a Template Others Fill In
So say you’re building a weekly expense form. Rows hold formulas that total each category. Only a few cells, the actual expense entries, should ever be typed into.
First, select every input cell where someone should type a number. Open Format Cells, go to Protection, and uncheck Locked for just that selection.
Then select the whole sheet and confirm the formula cells are still checked as Locked, which they will be by default unless something changed that earlier.
Finally, go to Review, Protect Sheet. Now the formulas are safe from accidental edits, while the input cells stay fully usable. Anyone filling out the form can type numbers freely and never touch a formula by mistake.
💡 Pro tip: Test the finished template yourself before sharing it. Try clicking a formula cell and confirm Excel blocks the edit, then try an input cell and confirm it works normally. A quick test catches a missed cell faster than a user complaint does.
What Protection Doesn’t Stop
So it’s worth being clear about what sheet protection actually prevents, because it’s narrower than it sounds.
Protection stops someone from typing into a locked cell while using Excel normally. It does not encrypt the file, and it does not stop someone from copying values out of locked cells and pasting them elsewhere.
It also doesn’t stop a determined user from removing protection through Excel’s own menu, especially if no password was set. And without a password, the barrier is closer to a courtesy reminder than a real lock.
⚠️ Watch out: Sheet protection is not a security feature for genuinely sensitive data. It’s a guardrail against accidental edits by people using the sheet as intended. For real confidentiality, that’s a different problem entirely, solved with file-level permissions, not cell locking.
Locking Formulas but Hiding Them Too
Format Cells’ Protection tab has a second checkbox most people never notice: Hidden. It works alongside Locked, not instead of it.
Checking Hidden, then protecting the sheet, stops a formula from showing in the formula bar when that cell is selected. The result still displays normally in the cell itself. Only the underlying formula text disappears from view.
This matters for templates with proprietary calculations, where the output needs to stay visible but the method behind it doesn’t. Like Locked, Hidden only takes effect once the sheet is protected. Checking it alone changes nothing.
If You Forgot the Password
So what happens if a sheet was protected with a password, and that password is now lost? Microsoft’s own tools don’t include an official password-recovery feature for sheet protection.
For older file formats, third-party removal tools exist and often work, since worksheet protection historically used weaker encryption than file-open passwords. For newer files and stronger protection settings, removal is far less reliable.
📊 Note: The more dependable fix is prevention: keep a password manager entry for any sheet protection password the moment it’s set, the same as any other credential worth keeping.
Excel Desktop vs. Excel for the Web
So does this work the same way in a browser as it does in the desktop app? Mostly, but not entirely.
Excel for the Web supports locking cells and protecting sheets using largely the same steps, reached through its own Review tab. But some advanced protection options available in desktop Excel, like restricting specific actions such as sorting or using AutoFilter on a protected sheet, are more limited in the browser version.
For straightforward cell locking, the difference rarely matters. For a workbook with detailed, granular protection rules, building and testing it in desktop Excel first is the safer approach, then confirming the same protection behaves as expected once opened in the browser.
Protecting Multiple Sheets at Once
So what if a workbook has fifteen sheets and every one needs the same protection? Protect Sheet only applies to whichever sheet is currently active. It doesn’t extend automatically across the whole workbook.
Applying it fifteen times by hand works, but it’s tedious and easy to miss one sheet by accident. Right-clicking any sheet tab and choosing Select All Sheets first, then applying Protect Sheet, still only protects the sheet that was active when the dialog opened, not all of them together, since that’s a quirk of how the grouped-sheet feature interacts with the Protect Sheet dialog.
For genuinely uniform protection across many sheets, a short macro recorded once and reused is far more reliable than repeating the manual steps by hand each time. That’s beyond what this article covers directly, but it’s worth knowing the manual route doesn’t shortcut past sheet count the way grouping other actions does.
Checking Whether a Sheet Is Already Protected
So before locking anything new, it helps to confirm a sheet’s current protection status. The clearest sign sits right on the Review tab itself.
If the button reads “Protect Sheet,” the sheet is currently unprotected. If it reads “Unprotect Sheet” instead, protection is already active, and any new Locked or Hidden settings won’t take effect until you unprotect, make the change, and protect again.
📊 Note: This single button doubles as a status indicator. Checking it first avoids the confusing situation of changing a cell’s Locked property and wondering why nothing happened, when the real issue is that protection needs to be reapplied for any change to register.
A Faster Way for Large Sheets
So for a sheet with dozens of input cells scattered across it, selecting them one by one gets tedious fast. A quicker route exists.
First, select the entire sheet with Ctrl+A, open Format Cells, and uncheck Locked for everything. This flips the default, making every cell unlocked to start.
Then select only the cells that should stay protected, like formulas or headers, and check Locked just for those. Finally, protect the sheet as usual.
This inverted approach, unlock everything first, then re-lock the exceptions, is often faster than the reverse when the protected cells are the minority rather than the majority.
💡 Pro tip: Use Go To Special, found under Home, Find and Select, to select all formula cells at once instead of clicking through them individually. That single step often covers exactly the cells that need to stay locked.
A Simple Rule to Remember
So if there’s one thing worth remembering from all of this, it’s this order: unlock the exceptions, lock everything else by default, then protect.
Locking, on its own, changes nothing. Protecting is the step that turns a checkbox into an actual restriction. And a password only decides who can undo that protection later, not how well it works while it’s active.
Once that order clicks, the whole feature stops feeling confusing. It’s four simple steps, done in the right sequence, not four scattered settings that happen to live in the same menu.
How to Lock Cells in Excel, One More Time
So to walk through how to lock cells in Excel one final time, start with the cells, not the sheet. Select just the ones that need protecting.
Then open Format Cells. Check Locked. But nothing happens yet, because that step alone changes nothing at all.
So go to the Review tab next. Click Protect Sheet. That’s the step that finally makes it real.
And if a password matters to you, add one there too. If not, skip it. Either way, the locked cells now stay locked, and the rest of the sheet stays exactly as editable as before.
So test it once before sharing the file. Click a locked cell. Confirm Excel blocks the edit. Then click an unlocked one and confirm it still works normally.
Because a thirty-second check like that catches a missed cell far faster than waiting for someone else to find it by accident later.
So remember the order, not just the menu names. Select, then lock, then protect. Skip the last step, and none of the first two matter at all.
Because that one detail, buried at the bottom of most guides, is the entire reason this feature confuses so many people the first time they try it.
Common Questions
Why can I still edit a cell after checking “Locked”?
Because checking Locked only sets a property on the cell. It has no effect until you also protect the sheet from the Review tab. Locking and protecting are two separate steps.
Are Excel cells locked by default?
Yes. Every cell starts with its Locked property already checked, before you do anything. That default only matters once the sheet is protected.
Do I need a password to protect a sheet?
No, a password is optional. Protection works without one, but anyone can remove it with a single click on Unprotect Sheet if no password was set.
How do I let some cells stay editable on a protected sheet?
Before protecting, select those specific cells, open Format Cells, go to the Protection tab, and uncheck Locked. Then protect the sheet as usual.
What’s the difference between Protect Sheet and Protect Workbook?
Protect Sheet controls whether individual cells can be edited. Protect Workbook controls the workbook’s structure, like adding or deleting sheets. They don’t overlap.
Can I unlock cells after the sheet is already protected?
Yes. Microsoft’s own documentation confirms cells can be unlocked after protection is applied, though unlocking beforehand is the recommended order.
The Short Version
- →Checking Locked in Format Cells does nothing by itself.
- →Cells are locked by default already, before you touch anything.
- →Protect Sheet, on the Review tab, is the step that actually enforces it.
- →A password is optional and only controls who can remove protection.
- →Unlock any cells that should stay editable before protecting the sheet.
- →Protect Sheet and Protect Workbook control different things entirely.