

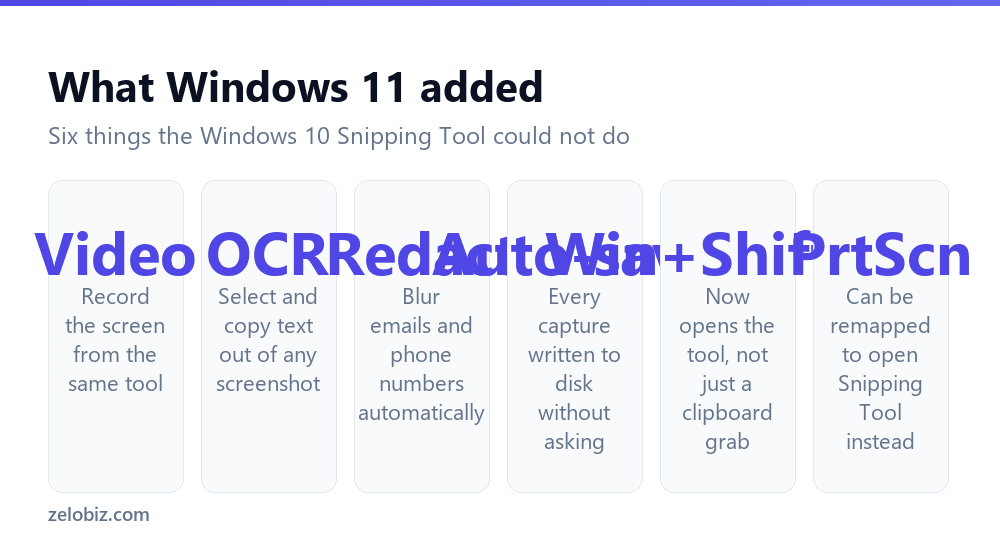
To take a screenshot on Windows 11, press Windows + Shift + S to capture any region, or Windows + PrtScn to save the whole screen to Pictures › Screenshots. What’s genuinely new on Windows 11 is what happens next: the redesigned Snipping Tool records video, extracts text out of images with Text Actions, blurs sensitive details with Quick Redact, and can auto-save every capture without you pressing Ctrl+S.
The shortcuts are the same. The tool isn’t
If you’ve come from Windows 10, the capture shortcuts haven’t changed and you can keep using them exactly as before — we cover all six methods in the main guide to screenshots on Windows.
What changed in Windows 11 is the application behind them. Snip & Sketch and the old Snipping Tool were merged into one app, and it has since gained several things that have nothing to do with taking a picture of your screen — screen recording, optical character recognition, and automatic redaction. Most people press Windows+Shift+S, click the notification, crop, and save, never noticing any of it.
The interesting part of the Windows 11 Snipping Tool is what it does after the capture, not how you take one.
Turn on auto-save first
The single setting worth changing. By default a capture goes to your clipboard and exists nowhere else — close the notification without clicking it and the image is gone for good.
Open the Snipping Tool, click the three dots, choose Settings, and turn on Automatically save screenshots. Every capture then writes a PNG to Pictures › Screenshots as well as going to the clipboard. It costs a few kilobytes per screenshot and removes an entire category of frustration.
While you’re in there, Ask to save edited screenshots is worth enabling too. It prompts before you close the editor with unsaved changes, which catches the case where you’ve annotated something carefully and then clicked the X.
Recording video from the same tool
Windows 11’s Snipping Tool records the screen, which removes the main reason people used to install third-party capture software for quick demonstrations.
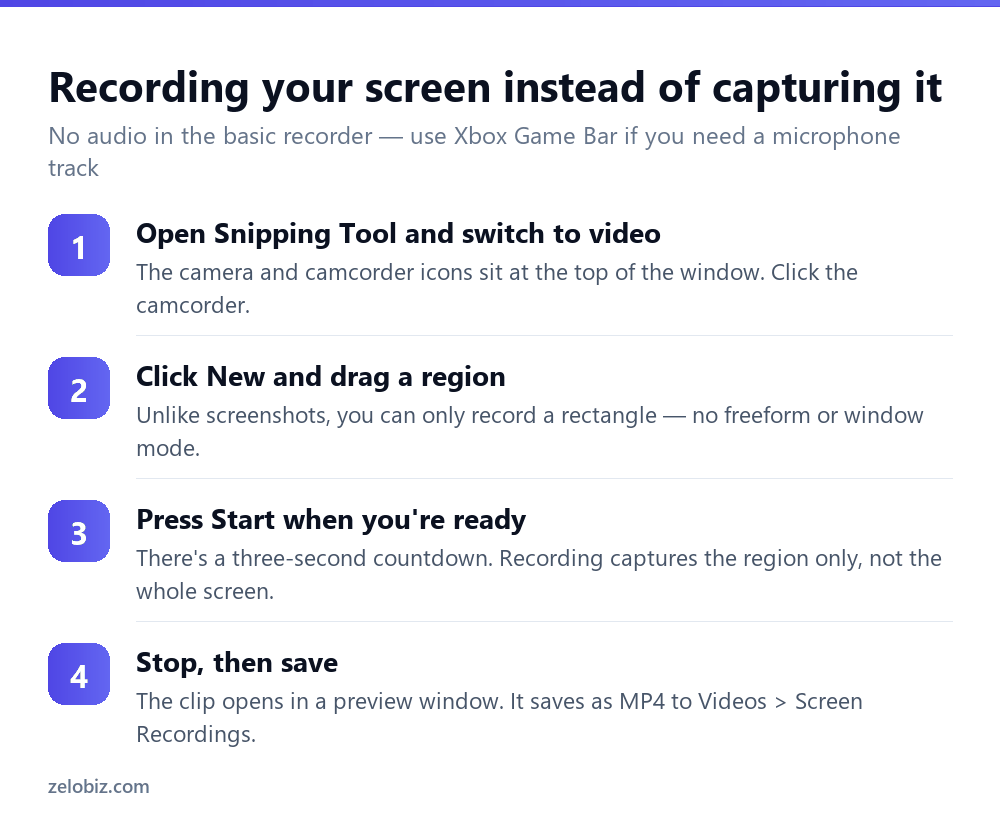
Two real limitations. There’s no audio in the basic recorder, so it’s fine for showing a sequence of clicks and useless for narrated instructions. And you can only record a rectangular region — you can’t follow a window as it moves.
If you need a microphone track or system sound, use Windows + G for the Xbox Game Bar instead. Despite the name it records ordinary applications perfectly well, includes audio, and saves to Videos › Captures.
⚠️ Watch out: The Game Bar cannot record File Explorer or the Windows desktop itself — Microsoft blocks it. For those you need the Snipping Tool recorder or third-party software.
Text Actions: stop retyping things
This is the feature most worth knowing about and the one almost nobody has found.
Take a screenshot, and in the editor click Text Actions. The Snipping Tool runs OCR across the image and the text becomes selectable, exactly as though it were a web page. Drag across it, Ctrl+C, and paste it anywhere.
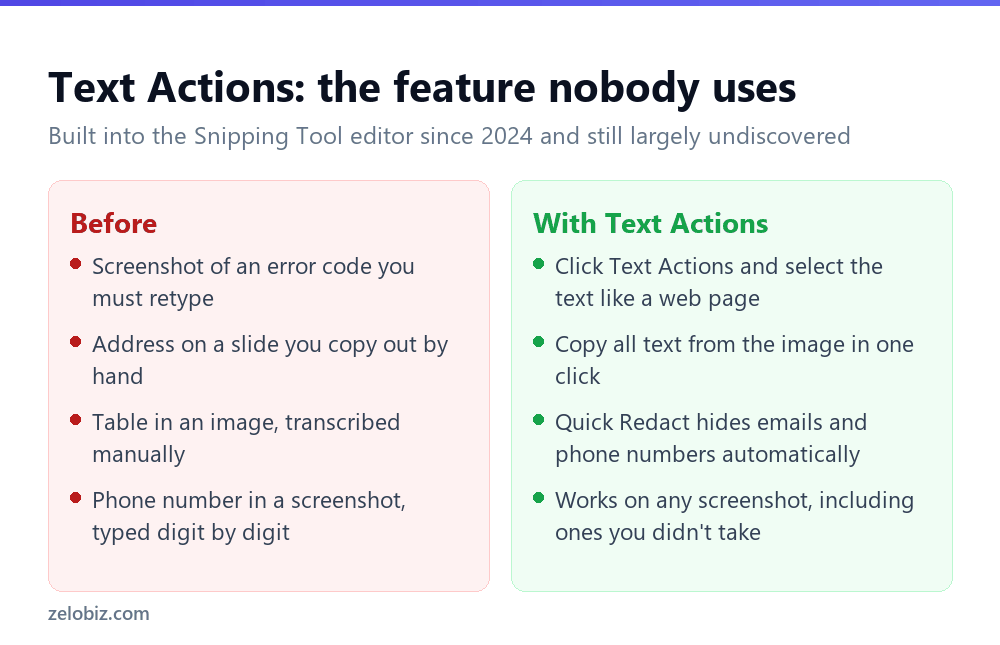
It handles a long error code from a dialog box, an address on a slide, or a table someone sent as a picture. Accuracy on clean on-screen text is very good; it struggles with photographs of screens and with unusual fonts, which is a reasonable trade.
Quick Redact
Alongside Text Actions sits Quick Redact, which finds email addresses and phone numbers in the image and blacks them out in one click. You can also select any text and redact it manually.
Worth building into your habits if you share screenshots at work. Sensitive details leak through screenshots constantly — a customer name in a browser tab, an internal URL, an account number in a sidebar nobody looked at before hitting send.
The PrtScn key behaves differently now
On a clean Windows 11 install, pressing Print Screen opens the Snipping Tool rather than silently copying the whole screen to the clipboard. That’s a change from Windows 10 and it confuses people who upgraded.
It’s a setting, not a fault: Settings › Accessibility › Keyboard, then ‘Use the Print screen key to open Snipping Tool’. Turn it off and PrtScn goes back to the old clipboard-only behaviour. Turn it on and you get a much more useful key.
💡 Pro tip: If you’re used to Windows 10, leave it on for a week before deciding. Print Screen opening a proper capture tool is genuinely better than a silent clipboard copy that gives no feedback at all.
Capturing a menu that disappears
Right-click menus and dropdowns close the instant you press a shortcut, and the delay timer is the proper answer rather than a trick.
Open the Snipping Tool from the Start menu — not with the keyboard shortcut — and set the delay dropdown to 3 or 10 seconds. Click New, and the tool vanishes while a silent countdown runs. Open your menu, hold it open, and the screen dims for capture when the timer ends with the menu still showing.
Nothing on screen indicates the countdown is running, which makes the first attempt feel broken. Ten seconds is more comfortable than three once you’ve fumbled a short one.
Screenshots on a tablet or 2-in-1
Windows 11 runs on plenty of devices without a Print Screen key, and the keyboard shortcuts are no use when the keyboard is detached.
Press Power + Volume Up together. The screen dims briefly and the image saves to Pictures then Screenshots, exactly as Windows + PrtScn would. It’s the same gesture phones use, and it works on Surface devices and most Windows tablets.
With a pen, clicking the top button twice opens the Snipping Tool directly on some devices — configurable under Settings, Bluetooth and devices, Pen and Windows Ink.
Snipping Tool settings worth changing
Windows 11 versus Windows 10, briefly
If you’re deciding whether any of this is worth upgrading for, it isn’t — but it’s useful to know exactly what differs.
- ✓Turn on automatic saving before you need it
- ✓Use Text Actions instead of retyping error codes
- ✓Run Quick Redact before sharing anything work-related
- ✓Use Game Bar when you need audio in a recording
- ✓Leave PrtScn mapped to the Snipping Tool for a week before judging
- ✕Installing capture software before trying the built-in recorder
- ✕Assuming the Snipping Tool recorder captures audio — it doesn’t
- ✕Closing the notification toast without saving, with auto-save off
- ✕Sharing screenshots of dashboards without redacting
- ✕Expecting Text Actions to read a photo of a monitor accurately
Frequently asked questions
What is the screenshot shortcut on Windows 11?
Windows + Shift + S captures a region to the clipboard and opens the Snipping Tool. Windows + PrtScn saves the whole screen straight to Pictures then Screenshots.
Can Windows 11 record the screen without extra software?
Yes. Open the Snipping Tool, switch to the camcorder icon, drag a rectangle and press Start. It saves an MP4 to Videos then Screen Recordings. There’s no audio — use Windows + G for the Game Bar if you need sound.
How do I copy text from a screenshot in Windows 11?
Open the capture in the Snipping Tool editor and click Text Actions. The tool runs OCR and the text becomes selectable, so you can drag across it and copy it like any other text.
Why does Print Screen open the Snipping Tool in Windows 11?
That’s the default on Windows 11. Change it under Settings, Accessibility, Keyboard with the ‘Use the Print screen key to open Snipping Tool’ toggle.
Where do Windows 11 screenshots save?
Windows + PrtScn saves to Pictures then Screenshots. Snipping Tool captures save there too if automatic saving is enabled, otherwise they only go to the clipboard. Screen recordings go to Videos then Screen Recordings.
Is Snip & Sketch still in Windows 11?
No. Snip & Sketch and the old Snipping Tool were merged into a single app called Snipping Tool, which is where all the newer features live.
- →All six capture methods, including Windows 10 — how to screenshot on Windows
- →Free up the space all those captures use: how to free up disk space
- →Arrange windows before capturing with how to split screen on Windows
- →On an Apple machine instead? How to screenshot on Mac